Learning To Strum
Take a look at the diagram below:
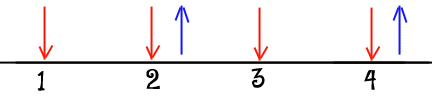
The RED arrows are strokes thatare to be strummed DOWNWARD.
The BLUE arrows are strokes thatare to be strummed UPWARD.
Think of the numbers below the pattern as "your foot tapping"... the numbers represent a "steady beat" or "pulse"... you might even count these out loud just like the music teacher always told you to, but you felt stupid doing... Well, Do it!... especially if you are having trouble locking into these patterns. Even if you screw up on your strumming and chord switching, try not to "break meter" or lose the steady beat.
Notice that there are two strums on beats 2 and 4. (1 down & 1 up) These are exactly half of the beat... so don't lose the "steady pulse" even though you are putting 2 strums in the same place as one... In other words, just hit the strings coming back up, too! (geez)
Okay, the above pattern throws a little curve at you. Notice that there in NO STRUM ON BEAT 3.
You REST on beat 3. The best way to do this is act like you're gonna strum downward, but don't!... then strum upward coming back. You may want to even count those little "&" signs out loud now, also!
Of course the patterns are meant to be played seamlessly over and over, usually throughout the song.

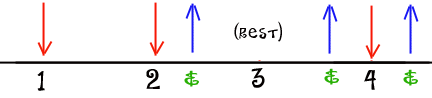
The strumming pattern above is in "3" or "3/4 Time". Which means that your steady pulse is counted in "threes" like this.. 1-2-3, 1-2-3, 1-2-3, 1-2-3, and so on. If you were to sing this pattern, it might sound like this...
"Red Lollipop, Blue Lollipop, One Lollipop, Two Lollipop, and so on...
"Lollipop" would be the 3 strums in a row on beats 2 & 3... get it?
You could also look at this like- They are ALL DOWNWARD strums except on the "&" of beat 2.
....(the "and" of beat two.)...and you would count this one out loud like this...
"..One, Two and Three, One, Two and Three, One, Two and Three, and so on.
 G MAJOR SCALE HERE


The RED arrows are strokes thatare to be strummed DOWNWARD.
The BLUE arrows are strokes thatare to be strummed UPWARD.